Christmas Assembly or All-Age Service Talk (With Sweets!)

Here is the talk I did today at a school Christmas concert.  The children loved it because it involved sweets! I tried to get them to predict the contents of parcel 6 and had some random ideas but also some very sensible suggestions such as “Milky Way’ or ‘Mars’ because “God Made them.”  They were definitely paying attention!

love-hearts

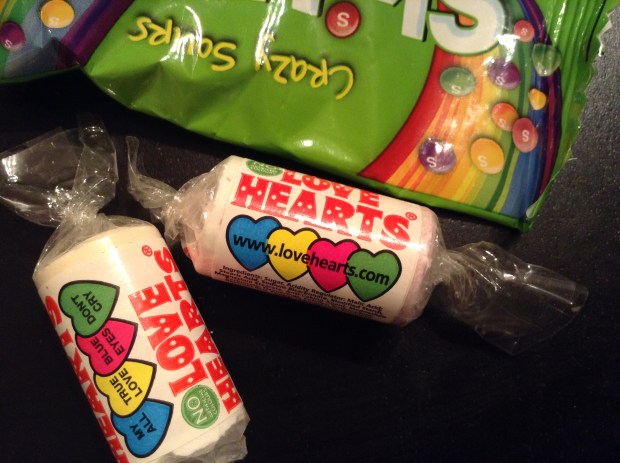
You will need: A big box filled with 6 wrapped and numbered parcels. Each parcel contains one of the following- A Galaxy chocolate bar, ‘sour’ fizzy sweets, Love Hearts, Jelly Babies, Starbursts, Liquorice Allsorts (see order below), another gift bag filled with enough sweets for every child to have one.

Ask the children who has presents under the tree already.  Who is expecting to get or give a present this Christmas? For Christians, Christmas is about the most special present of all (open the big box and give each parcel to a different volunteer child.  Tell them not to open them until you ask).

So let’s see what’s in our presents.

(Ask the child with present 1 to unwrap it and tell you what they have. Give the explanation and then move on to parcel 2. Repeat until all parcels are open!)

1- Galaxy- God made everything- the world, the stars, space, the Galaxy, the whole universe
2- Sours- I’m not keen on sours- the don’t taste like sweets should, in my opinion!  Things in God’s world weren’t going as they should, either. There was war and hatred and sadness. People needed someone to come and give them hope, to help them and show them a new way to live
3- Love hearts- God loved us so much that he decided to send someone very special- his own son who had been with him since the beginning of everything
4- Jelly babies- so God sent a baby- and Jelly babies were originally called peace babies so this reminds us that one thing Jesus came to do is bring us peace
5- Starburst- God sent a star to shine over the place where Jesus was born so that people would know where to find him

(At this point I tried to get the children to suggest what would be in the final parcel…)

6- Liquorice All sorts- I don’t like these at all, but some people love them and that’s the point! These remind us that Jesus came for all sorts of people-everyone. The hope and peace he brings is God’s gift to us all.

BUT… at the moment, the only people who have sweets are the people who opened the presents.  Who thinks that’s fair?   Jesus came to give hope and light and peace to everyone, so no no one will be left out (give the bag full of sweets to a teacher or, if with a smaller group give the sweets out).

Merry Christmas!

Posada: a fun way to reach the community during Advent!

This year will be the second year we send out a Posada from church into the villages where our churches are based.

If you’ve never heard of a Posada, it’s a South American tradition where Mary and Joseph take a journey through the community every Advent (mirroring the real life journey of Mary and Joseph to Bethlehem) and people sign up to host them for a day and a night before passing them on to the next hosts.  It’s a great way of getting people from both inside and outside of church involved in the Nativity story over Advent and will open up many conversations with people who are puzzled about why two dolls are joining in events!

Last year Mary and Joseph had some amazing adventures: They went to a Derby County football match (their host that day had knitted them some scarves!), played in the sandpit at the local primary school, went to some cafes, rehearsed with the worship group, went to a few parties, spent time on the beach and went up in a cherry picker with a local handyman.  Each host took some photos and we uploaded them to our Posada Facebook page so everyone could see what they were doing.

Mary and Joseph finished their journey at the crib service on Christmas Eve and, next morning, they were displayed in church  complete with a baby Jesus!

Have a look at our Facebook page to see what they are up to this year and why not have a go yourself!

School Club Session: The 10 Lepers


2015-02-12-20-30-15

5 mins Reflective colouring while waiting for all children to arrive.  Click here for ideas to print out
5 mins Game- 10 cup bowling

Set out  10 cups in a ten pin bowling formation and throw a soft ball or beanbag at them.  Can you knock down all 10 with 3 throws?

2 mins Song (click for a Pinterest board of Children’s Ministry songs)
10 mins Tell the story either from a book or interactively.  The Lion Storyteller Bible is great! Get children thinking about what they are grateful for. Remind them that out of the 10 lepers, only one came back to say thank you. Why do you think that was? How do you feel when someone forgets to say thank you? What would you like to say thank you for?
10 mins Prayer: balloon praise- blow up balloons and write/ draw thank you prayers on them with sharpies (or write on stickers and stick to the balloons) Play some music and bat the balloons around. When the music stops, everyone grab a balloon and say thank you to God for something on that balloon. Repeat.

Make up a word search using words from the story or using word of things they would like to say thank you for.  Click here to print out a blank word search sheet.

3 mins End with a game!  Click here for a Pinterest board full of ideas.

The Exodus Story: Life in the Desert Sandpaper Painting

The Exodus story is a fabulously colourful and exciting one.  Miracle after miracle happens to the Israelites as they journey through the Red Sea and across the desert to the promised land.  This craft touches on the life bringing provision God brings to his people through manna, quail and water.

img_2747You will need: sandpaper (use quite fine sandpaper if finger painting as it is much less rough on fingers), paint.

The sandpaper is rough and reflects both the sand of the desert the Israelites are crossing and the hardship of life there.  Adding colour helps to reflect the life that God’s proven brings to them.

Encourage children to use their fingers or brushes to paint on the sandpaper.  They might want to paint something from the story they have heard or simply to create a colourful picture.  Use the time to talk about how God provided for the Israelites in the desert, bringing them life and showing his love.

Daniel Messy Church ideas

Here are some crafts we did at a recent Messy Church looking at the story of Daniel (including his healthy eating habits along with the lions!)

IMG_2533

Making instruments with wood and recycling materials

IMG_2534

Making statue (heads!) of the King with balloons and Modroc

IMG_2535

Lion masks

IMG_2536

Making a ‘den’ from straws and sellotape- This needs patience but, when it was finished, we could fit a 6 year old inside it!

IMG_2540

A missing fruit/ vegetable ‘Kim’s Game.’  Show all the fruit and veg you have for 30 seconds. Ask the player to turn away while you remove one of the items.  They then turn back around and have to guess what is missing!

IMG953

  • Tell the story by printing out the story cards here and putting each card into a pass the parcel layer.  Play the game and when all the cards have been revealed put the story in order.
  • Thank God for people who help to keep us safe and every time you say ‘Amen’, shake your instruments!

Click here for more ideas to help you explore the story of Daniel.

Click here for a Pinterest board of Daniel ideas.


Bible Story Response: Styrofoam Prints

This is a really easy idea that can be use with any Bible Story whatsoever.  Just beware that it involves getting the paint out!

IMG_2620

You will need: paint, paper, flat styrofoam circles or squares cut from styrofoam plates or sheets, pencils, paint brushes

Talk to the children about their favourite part of the story, their favourite character or the most striking part of the story they have heard. Ask them to draw a simple picture of what they have shared on the back of the styrofoam circle or square, pressing lightly with a pencil.

When they have drawn their picture lightly, get them to press harder with their pencil on all of the lines so that the lines become quite deep (but not so deep that they cut through the back of the sheet!)

Paint a thin layer of paint over the etched in drawing and then press the paint side down firmly onto a piece of paper.

Lift up the styrofoam and you should be left with a print of your picture! Repeat and give the children time to share and explain what their pictures show.